
I learned this method from a dear friend, Kate Swan, who apart from doing her PhD in social work, runs an adorable etsy shop called Fierce Deer. It requires very minimal materials, most of which you may already have on hand. Screen printing can be used to make and decorate many things, so I hope this tutorial gets your creative juices flowing!
 Step 1: Gather your supplies. You can find the sheer fabric in large quantities at most thrift stores, usually in the curtain section. It can come in many colours, but is usually white. One curtain is enough to make many frames. Non-soluble glue can be difficult to track down, but I was able to find some at a hardware store. Where can you find a wooden frame? It's the other half of the glass used in the Linocut Tutorial!
 Step 2: Cut out the sheer fabric. Measure the sheer fabric two or three inches wider than your frame. Cut it out and lay it flat.
Step 3: Secure the edges. Begin stapling the fabric one corner at a time while tightly pulling the fabric.
Step 2: Cut out the sheer fabric. Measure the sheer fabric two or three inches wider than your frame. Cut it out and lay it flat.
Step 3: Secure the edges. Begin stapling the fabric one corner at a time while tightly pulling the fabric.
 Step 4: Secure fabric around the frame. Continue to pull the fabric tight and secure with staples around the frame. Feel around the edge of the fabric to find any slack, and secure with another staple. The corners may require two staples (one on each side).
 Step 5: Trim the extra fabric.
 Step 6: Trace your design onto the screen. Most screens I've made I did not design on the computer first, but I find it helps a lot to keep the design crisp and lines straight. Most of all, it helps you better envision what the screen will look like, because you can easily play with shapes in black and white. Because you are tracing, not burning the screen, it does not need to copied onto the screen backwards. Keep in mind that the thicker your lines are the better, therefore it's best to keep it simple. Trace with pen or pencil, but make sure whatever you use has a soft/dull tip so it doesn't puncture the fabric.
 Step 7: Fill white space with non-soluble glue. Where you don't want paint to go, cover with glue. It's easiest to use a fine brush with a flat tip, so you can make crisper edges and lines. If you mix the glue with food colouring, it is easier to see where you are painting, but it's not a requirement. Cover the outside of your design with glue all the way to the edges so no paint seeps out between the frame and the fabric. Flip backwards and forwards between both sides to ensure the glue is evenly spread. Let the glue dry.
 Step 8: Choose your fabric. Decide where you want the print to end up and prepare that material. Iron or cut out if needed. If you want to screen print on an article of clothing or a bag, you will need to put a piece of cardboard between the layers so the paint does not seep through. The less-stretchy the material, the longer the print will last and the better it will look. For this project, I cut up a pair of my husband's irredeemably holey pants.
 Step 9: Set the screen on the fabric. Make sure you are working on a very flat surface. If it feels like there are dips on your table, put a big book underneath.
 Step 10: Begin painting. Hold the frame down with one hand to minimize any gaps between the screen and fabric. Dip the brush in the paint a hefty amount. Use the brush in a stabbing motion to cover with paint, going over the same spots a few times to ensure the paint has gone through. The thicker your fabric, the more times you may need to go over your design. Make sure to get to the edges and "stab" each spot equally using generous amounts of paint.
 Step 11: Cover the whole screen using this method.
 Step 12: Peel the fabric off. Flip the screen over and take the fabric off. You can peel a corner first to check and make sure the paint has seeped through evenly. Take it off just a bit slower than a band-aid rip so you don't smudge any ink.
 Step 13: Make a bunch! It's best to do numerous prints in a row to make the most of the paint. Once you are finished, the screen needs to be rinsed out right away so that no paint dries on it, which will ruin the screen.

 Step 14: Seal the paint. In order for the paint to last a long time and survive through the washing machine, the paint must be sealed/cured. To do this, you have a few options. I used to spend time ironing each print for three minutes or more each. However, after screen printing expert Dan Smith & sidekick Derek Zanetti (listen to their music!!) toured through Hamilton last year, I learned a new trick. Heat your oven to about 400F, and pop in the prints on a cookie sheet. Turn off the oven right away, and let the heat drop with the fabric still inside. Wait a minute or so then take it out. This way is much faster, but you have to be careful you don't leave them in too long or you risk burning or discolouring the fabric.
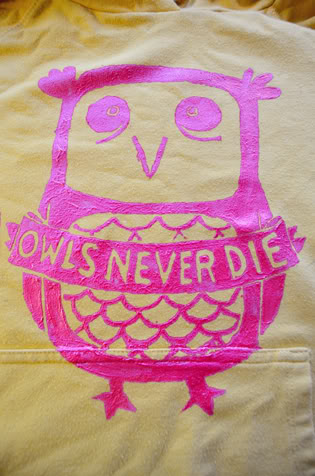
 Step 15: Do another one! There are countless fun designs, colours, and things you can make. Go Crazy!

5 comments:
Michelle. this is amazing! i'm going to try this :)
do it! if you want to try things out before you buy materials i have lots to spare.
does the glue not wash out? i just started trying some printing..and went the fancy expensive route cause i have some very fine detail i needed and didnt think i could get it with glue...anyways i just used a big 25 c. embroidery hoop from the thrift store. easier than removing it after being stapled on a frame and you can use the same one over and over! this is good for me because i already have to many canvas's laying around! fun stuff on here michelle!
Love this!
Post a Comment